
I discovered Furkot kind of by accident while researching scenic route options for my Yellowstone road trip last month. It turned out to be an invaluable tool for planning the trip. I’m going to show you how to use it to plan your next trip.
This is not going to be an exhaustive tutorial for using Furkot. It’s jam-packed with features, and while some of the advanced features may prove valuable to you, I was happy sticking with a small subset. Even so, it took me some time and effort to figure out how to use Furkot effectively. I hope the step-by-step tips here help make it easier for you.
I’m actually going to create a road trip as I write this blog post, sharing screenshots as I go. I’m going to plan a two-week road trip from Seattle to Yosemite. I am sure the steps I take will make sense no matter what kind of trip you’re planning. I encourage you to follow along and plan the same trip I’m doing using the steps outlined below.
Step One: Create an account
Actually, it’s not strictly necessary to create an account to begin planning a new trip, but you won’t be able to save and come back to your plans in progress without an account. You can also start planning and create your account later, but you might as well set up your account from the beginning.
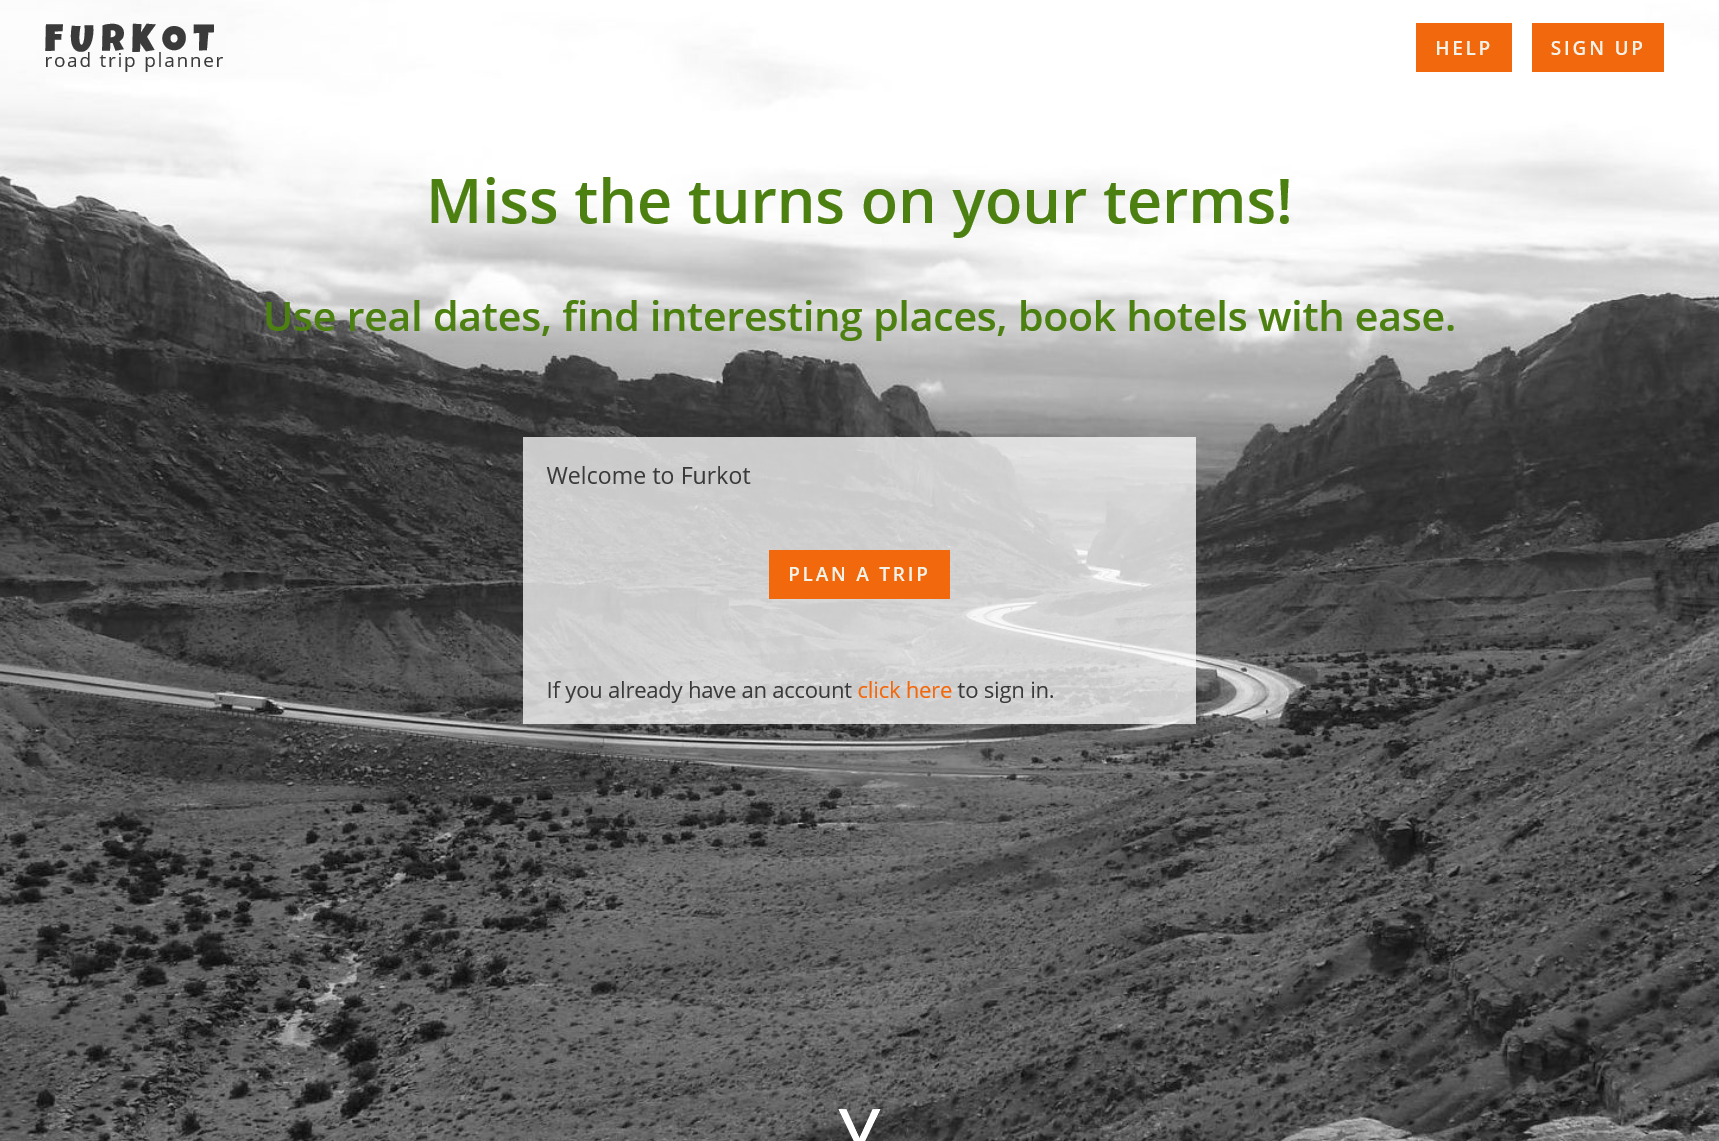
The first time you visit Furkot, you’ll come to a page like this:
If you click the Sign Up button in the upper right corner, you’ll see this:

As you can see, you have a number of options for creating your account, including a separate account with its own username and password. Go ahead and sign up however you want.
Once we create an account, we arrive at the Plan New Trip screen. So let’s move on to:
Step Two: Plan a new trip

Let’s assume we’ve already made reservations at The Majestic Yosemite Hotel on July 4 and 5, 2019, and the following two nights at Tuolumne Meadows Lodge. And our entire trip is sixteen days starting on Saturday, June 29, returning home on Sunday, July 14.
We fill in the information on this screen. Enter Seattle WA USA as the Start Point. For Trajectory, click the button to set it as a loop back to my starting point. Now it asks for a mid point. We could select either of our lodging locations, so let’s enter Tuolumne Meadows Lodge. I don’t see the lodge come up as an option, but I do see Tuolumne Meadows Lodge Road, so we’ll go with that for now. Finally, enter a trip name.

One of the quirks of the Furkot user interface is how they display icons that are selected or unselected.Furkot uses thick (usually) green underlines to indicate selected options. If you hover over an icon, the tooltip tells you what will happen if you click the icon. If it’s already selected, the tooltip will say something like “Click to exclude hotels and motels from lodging suggestions” or “Hide scenic byways and backroads.” If it’s not selected and you hover over it, the tooltip will read “Click to let Furkot to suggest hotels and motels” or “Show scenic byways and backroads.”
Personally, I’d prefer if the tooltips displayed what the button is for rather than what will happen if I click it now. “Toggle scenic byways and backroads” would be clearer to me. But I’m getting used to it.
The next step gives us a few options to complete.
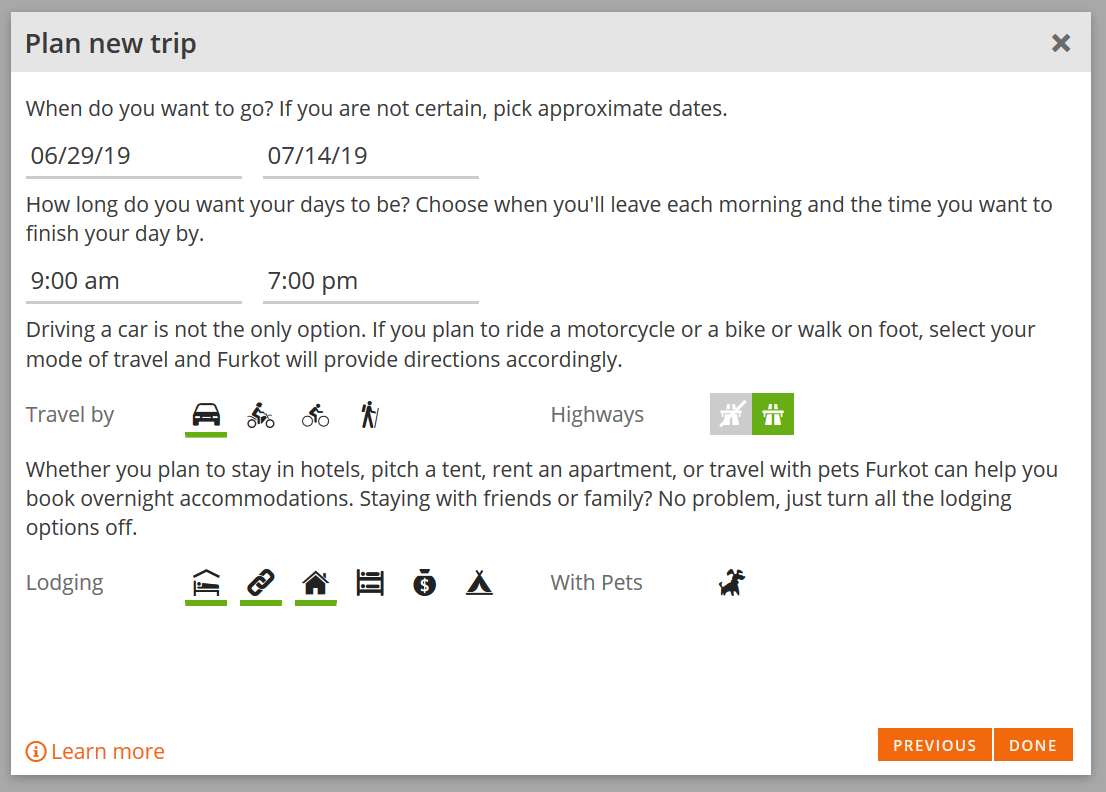
When we click Done, we arrive at a map view of our trip. The first time you do this, you’ll get a series of step-by-step instructions for getting started. You can dismiss these and bring them back later if you want using the menu at the top.
Want to learn what all the menu buttons do? Check out this help page. For now, the main button you should know about is the pencil, which toggles edit mode. If you find you are unable to edit your trip, check to make sure edit mode is on.
Step Three: Build your itinerary
Dismiss the introductory help popups and make sure we’re in edit mode. This is what we see:

The route map is pretty basic right now. It shows a direct route from Seattle to Tuolumne Meadows Lodge Road and back. Along the right are five “drawers.” Click on these orange tabs to explore what you’ve got so far. When a drawer is open, click on the orange tab again to close it.
- Trip
- This drawers has the basic trip information you established when you set up the trip. There are a few things you can edit here, but nothing critical to worry about right now.
- Plan
- This is the most important drawer, where we’ll be spending the most time customizing our itinerary.
- Sleep
- Here you can find places to sleep. You can use the links from here to go to external booking sites such as Booking.com, Airbnb, and more.
- Eat
- Find places to eat.
- Find
- You can use this drawer to look for all kinds of sights and plan stops.
Let’s go ahead and open the Plan drawer. It should look something like this:
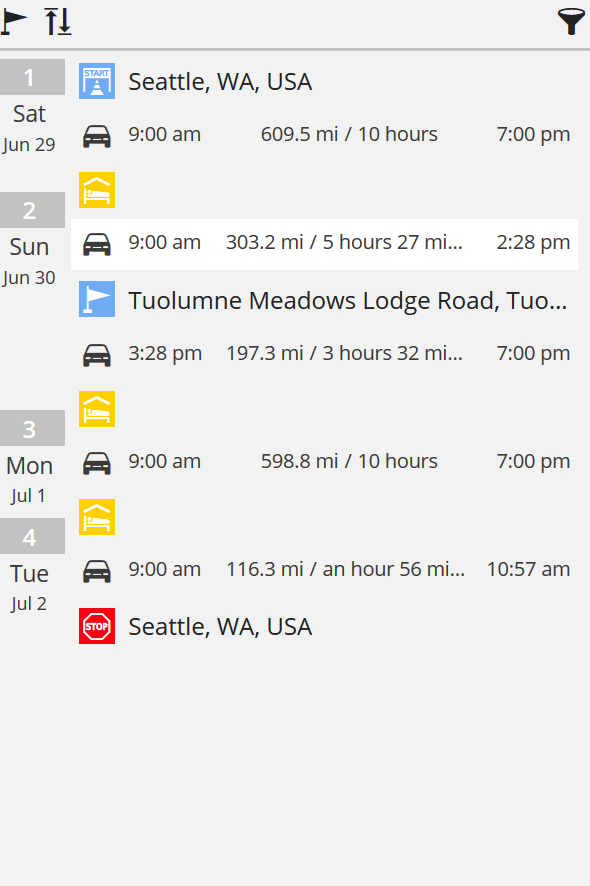
Based on my start and end times, it has determined we’ll need four days and three for my trip. We’ll arrive at our destination on the second day at 2:28 pm, stay for an hour, and then head home. We have three stops for lodging, represented by the three yellow hotel icons (both here and on the route map). Furkot placed those hotel icons on the map based on the length of our days and travel at 100% of the speed limit. (These are all configurable in the Trip drawer.) Obviously, this is not what we want. So let’s start customizing our itinerary.
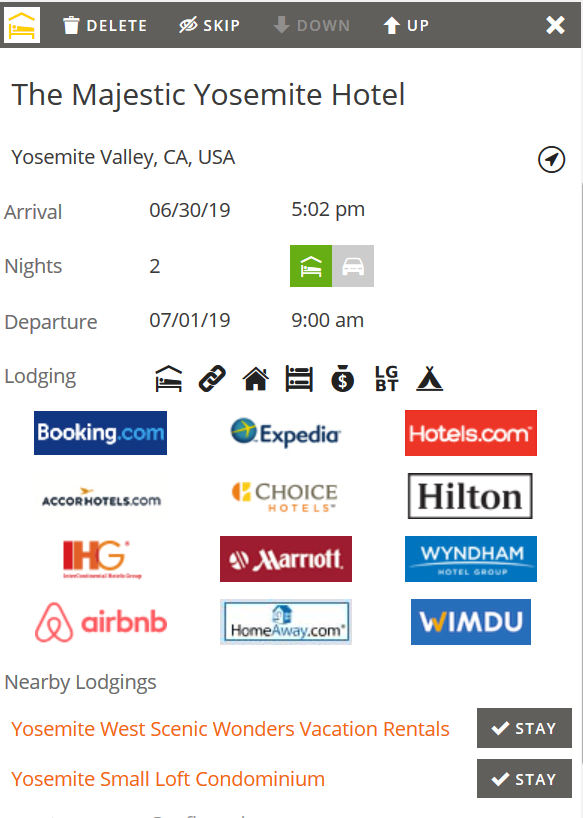
First, let’s add the lodging we already have reserved. Click “Add a new stop” (it’s the pennant button in the upper left corner of the drawer), and start typing “The Majestic Yosemite Hotel.” Note that auto-complete helps here. Also note that by default this shows as a one-hour stop. Click to change it to an overnight stop, and change the number of nights to 2.

When we click Save, we see this:
The dates are incorrect, but don’t worry about it yet. As we add plans and additional stops along the way, the dates will adjust. Furkot figures out the timing for us. And later, I’ll show you how you can lock in specific dates and times for your stops.
Now let’s do the same thing to add the Tuolumne Meadows Lodge to our plan.
- Click the pennant flag icon to add a new stop.
- Type Tuolumne Meadows Lodge, and change the stop type to stay the night.
- Change it to 2 nights.
- Click Save.
Now look at what’s happened.

Everything is out of order. We still don’t care about the dates yet, but we at least need to get everything in the right order.
First, now that we have our specific lodging, we don’t really need the destination we originally created at Tuolumne Meadows Lodge Road, so let’s delete that. Simply hover over it and click the trash can icon.
Now let’s get things in the right order. Hover over the first night at The Majestic Yosemite Hotel. In addition to the trash can there are a down arrow and an up arrow. Click the up arrow twice, until it’s before Tuolumne Meadows Lodge. Do the same with the second night. (You can also drag and drop these into position if you prefer.) Your plan should now look like this:
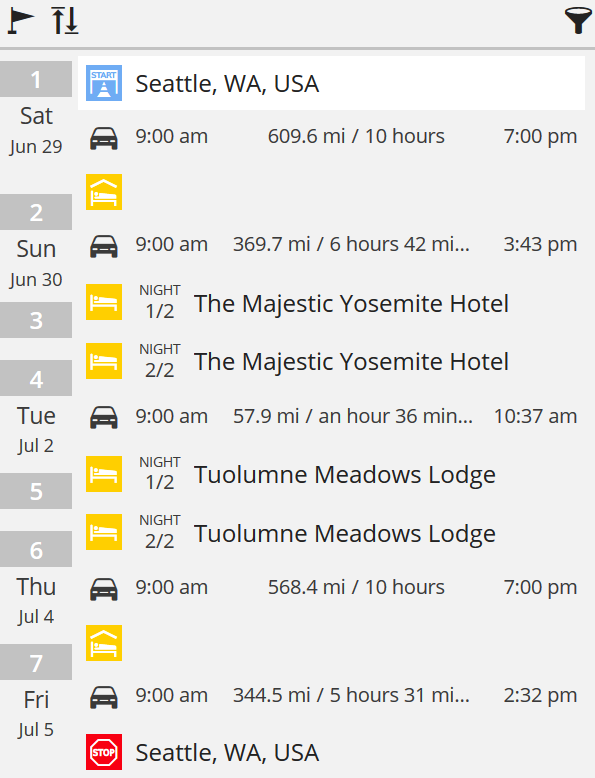
Okay, this is a lot better.
Now this is a road trip, and we’ve allowed two weeks, but Furkot tells us we will arrive at The Majestic Yosemite Hotel on Day 2 at 3:43 pm, four days ahead of schedule. Here’s where Furkot really helps us turn our road trip into an adventure. Let’s add some stops, along the way, some scenic routes and detours, and make this an epic road trip.
Step Four: Add a scenic route
We’ll start by looking for some interesting detours.
Close the Plan drawer if it’s still open (by clicking on the orange Plan button). If you can’t see your entire route on the map, click the button on the toolbar to “Show the entire trip.” (If you’re not sure which button that is, you can hover over the buttons to get tooltips.) You might notice your route has changed; it’s no longer the same route in both directions.
Let’s look for a more scenic drive along the Oregon coast. Zoom in so that the Oregon portion of your trip takes up most of the browser window. (You can use your mouse wheel to do that, or click the “Zoom in” button in the toolbar. You can also drag the map into position with your mouse.
Now open the Find drawer. You’ll see a row of buttons at the top of the drawer indicating various points of interest you can search for. We’re going to look for scenic byways and backroads, so find that button and click it. A scrollable list of routes is displayed, and they are displayed on your map as well.
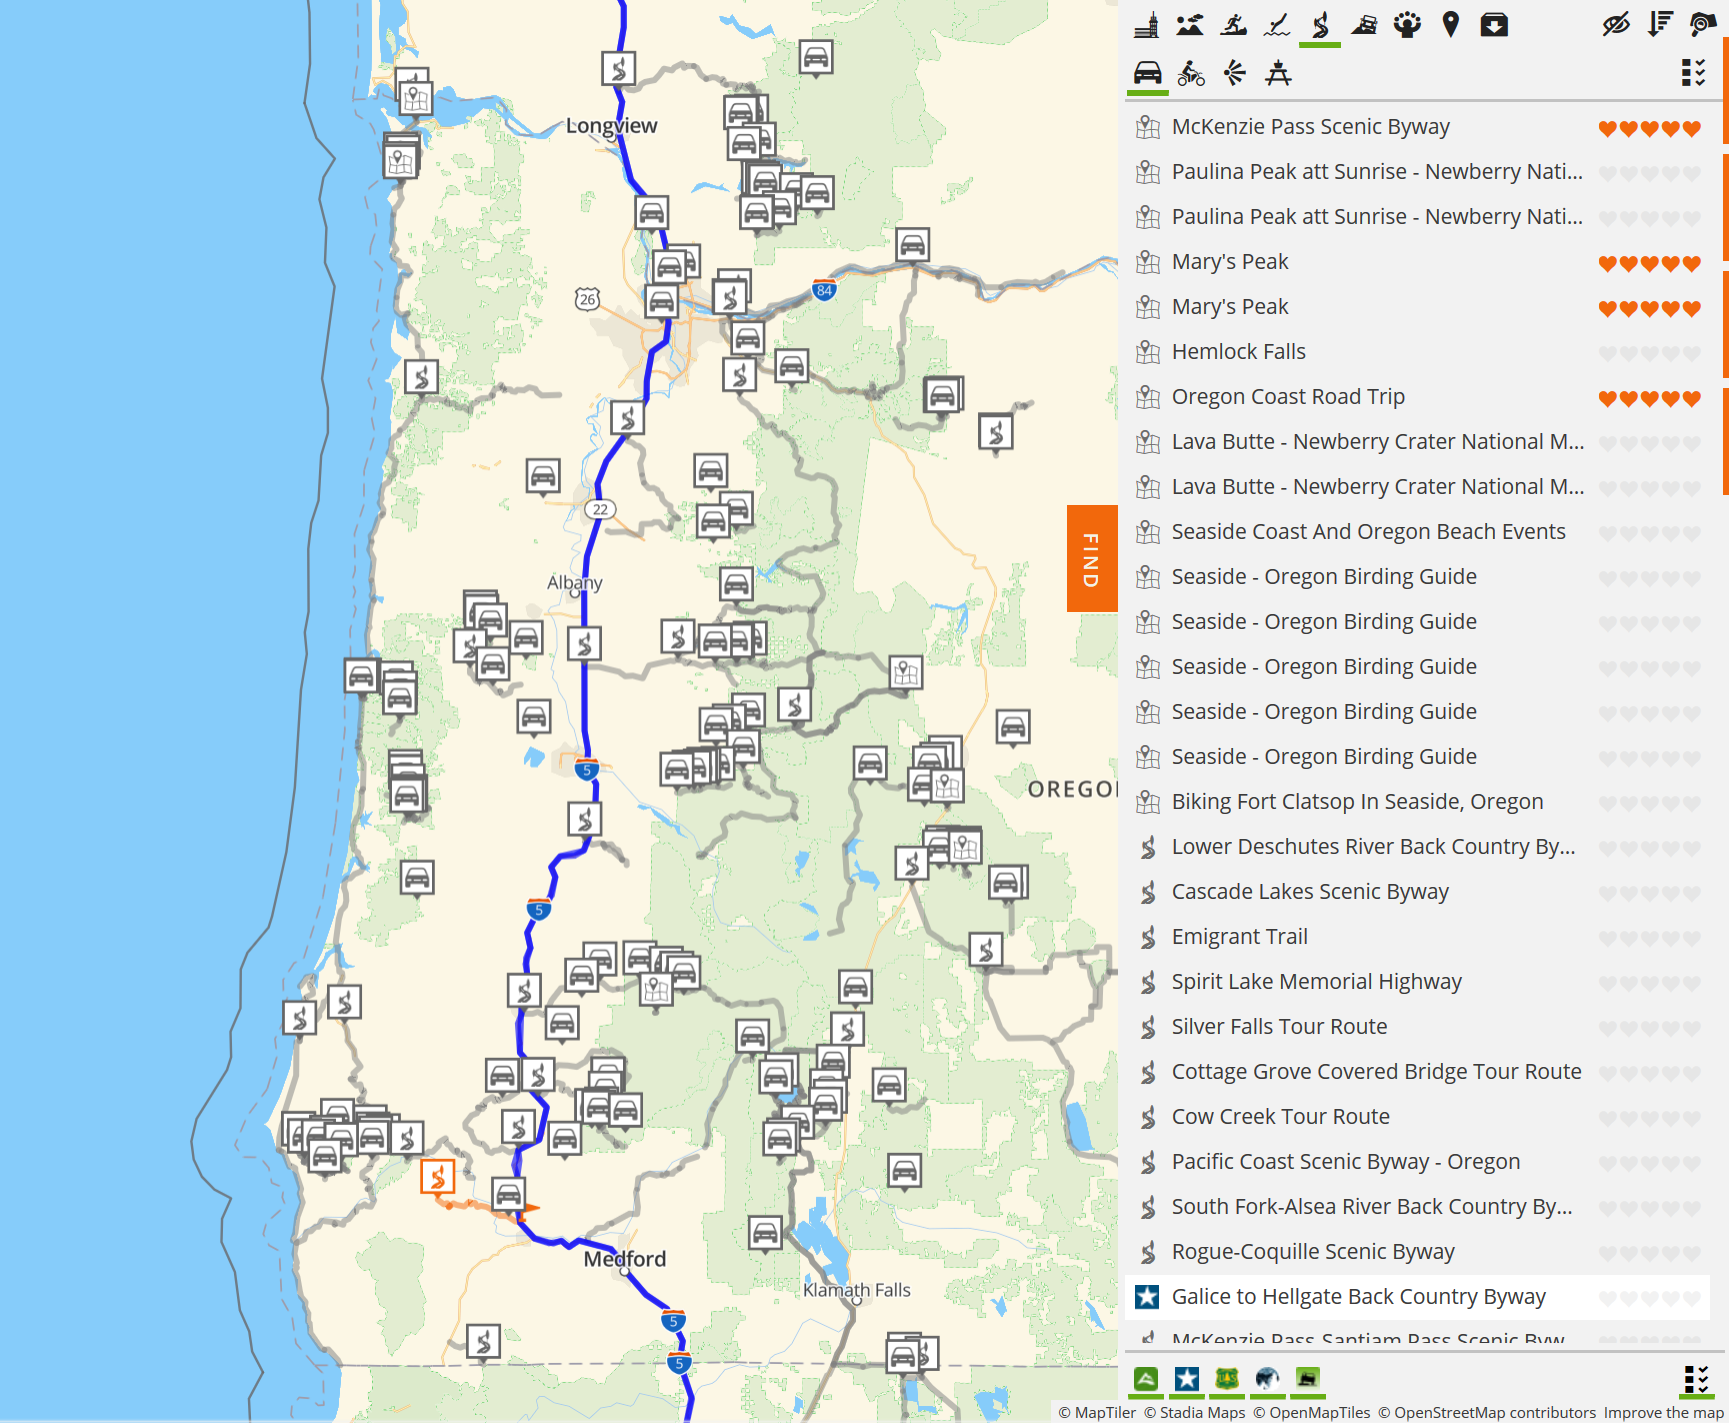
Where do all these scenic byways come from? If you look at the bottom of the drawer, you’ll see a row of colored icons, all selected.
![]()
Each of these represents a different source for byways and scenic routes:
- AllTrails
- America’s Scenic Byways
- U.S. Forest Service Motor Vehicle Route Maps
- Recreation.gov
- Trips shared by the Furkot community
You can hide any of these sources from the list. (I’m going to hide trips shared by the Furkot community; trips such as “Mom and Dad’s House,” “this again yes,” or “Daniel goes nuts” are more clutter than I need.)
Some of the scenic byways and backroads are displayed on the map with actual routes, and if you hover over those the routes are highlighted. Others are only indicated by single points on the map. Since we have a lot of time, maybe we can add a scenic drive along the Oregon coast. There are a few options to look at.
Click on “Oregon Coast Road Trip.” This shows a three-night itinerary. Sounds good. But the map shows it only as a Stop, not a route. When I click the link in the drawer, it takes me to the AllTrails website, but it doesn’t seem to find this itinerary there. Let’s move on. Click the X.
Further down you should see Pacific Coast Scenic Byway — Oregon. Hover over it and it highlights a route on the map. Looks great! Click it for a description. Then you can click the link if you want to read more about it at the America’s Scenic Byways website.
Unfortunately, adding scenic byways from these suggestions sometimes comes with unwanted side-effects. Sometimes the routes are interpreted by Furkot as going off-road, and some of these routes come with many stopping points that can clutter up your plan. I think it’s great to look through these to get ideas, but in the end you are better off adding detours manually.
So let’s modify our drive south with a drive along the Oregon coast. Hover over the route just south of Olympia and drag the route over onto US 101. You might need to do this several times, because Furkot will have you returning to I‑5 somewhere in Oregon. Eventually your route will stay on US 101 through Oregon and into California. Here’s my revised route:
Step Five: Add some stops
As long as we’re driving down the Oregon coast, we probably want to do some sightseeing and stretch our time to fill the days we have. So let’s find a few attractions and add them to our plan. And while we’re at it, let’s figure out where to spend the night along the way.
For starters, maybe we can stop in Astoria and see what’s interesting there. Zoom the map in on Astoria. You can use the + button in the toolbar, or use your mousewheel. Open the Find drawer and search for museums and man-made structures. Then select both museums and historical sites, monuments and landmarks. Make sure you have enough of Astoria in your view that you can see The Astoria Column in the list. Then select it and click Stop to add a stop. We can leave the duration at one hour.
The plan shows us arriving there at 12:30 and departing at 1:30. Maybe we should get lunch first.
Open the Eat drawer and select the knife and fork icon to show restaurants. Pick a restaurant where you’d like to have lunch. I’m going to pick Drina Daisy Bosnian Restaurant. Click stop and eat. Furkot suggests an hour, which sounds okay, but maybe I’ll go for a walk after lunch, so I’m going to change it to an hour and a half.
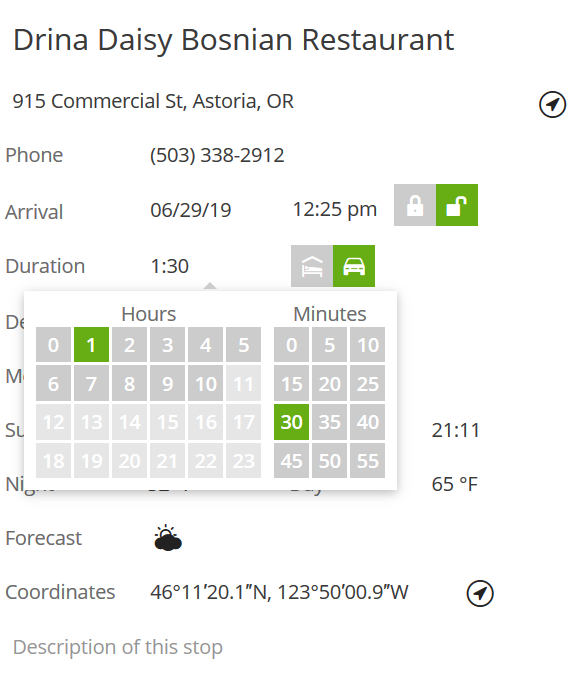
After I save, Furkot has added the restaurant to my plan before my visit to the Astoria Column. And it automatically moved my arrival and departure times accordingly.
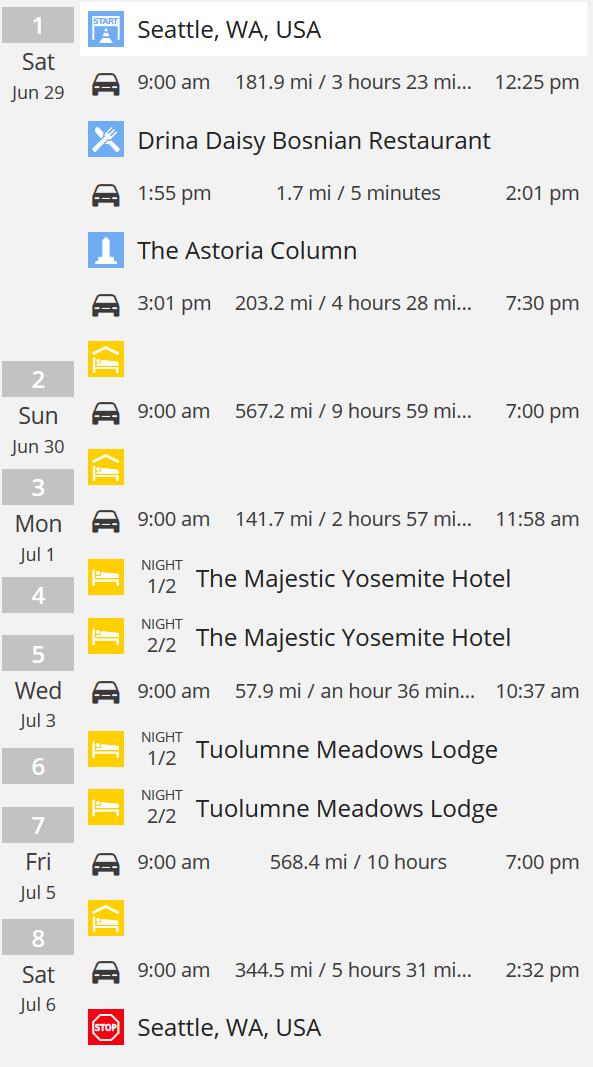
Notice that the plan has us driving until 7:30 pm on the first day. That seems like a bug in the program. We should be stopping by 7:00. That’s okay, though, because I hear Cannon Beach is really nice, so I’d like to spend the night there. Let’s add that.
In the Plan drawer, click the flag to add a new stop. Enter “Cannon Beach, OR, USA” and change the stop type to stay the night. Then click Save.
Furkot now gives us the opportunity to book our lodging using one of their partners.
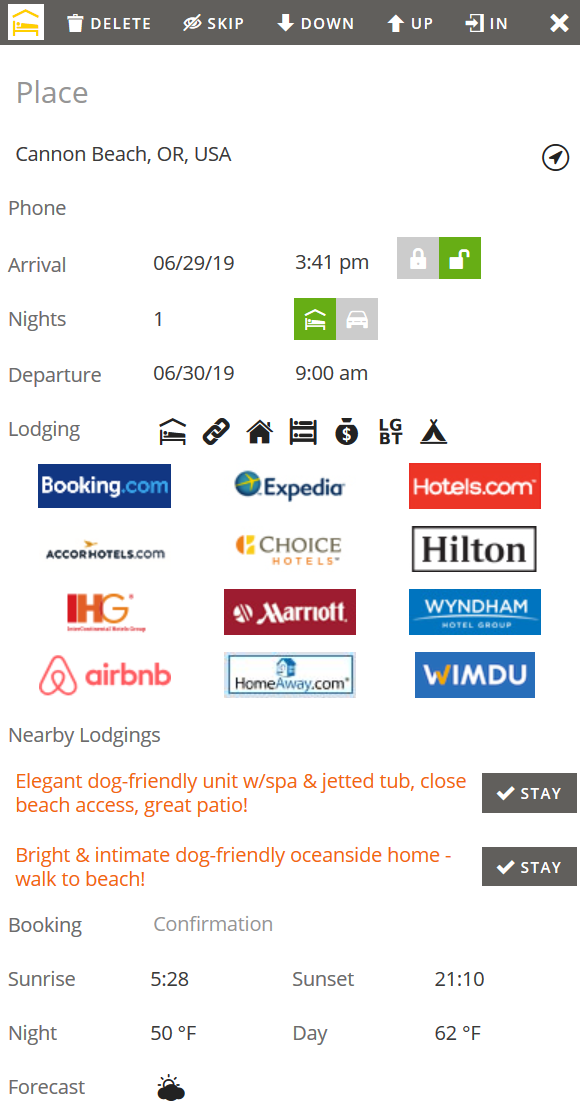
There are a few ways you can select your lodging:
- Click on one of the small icons next to Lodging. This will take you to the Sleep drawer and list lodging that fits your search criteria.
- Click on one of the partner icons to go to their website and book lodging with them.
- Select one of the Nearby Lodgings listed.
- Open the Sleep drawer and select your accommodations there.
- Simply type the name of the lodging of your choice.
I am picking the Cannon Beach Hotel.
The next night I want to stay in Bandon, Oregon. Here’s an even easier way to set a stop for the night there.
- Find Bandon on the map and zoom in so you can see lots of detail.
- Move the map around until you see some lodging on the map.

- Click on a hotel or motel or other lodging of your choice. I am going to select the Table Rock Motel.
- Furkot adds the motel to my plan as an overnight stop. Click Save.

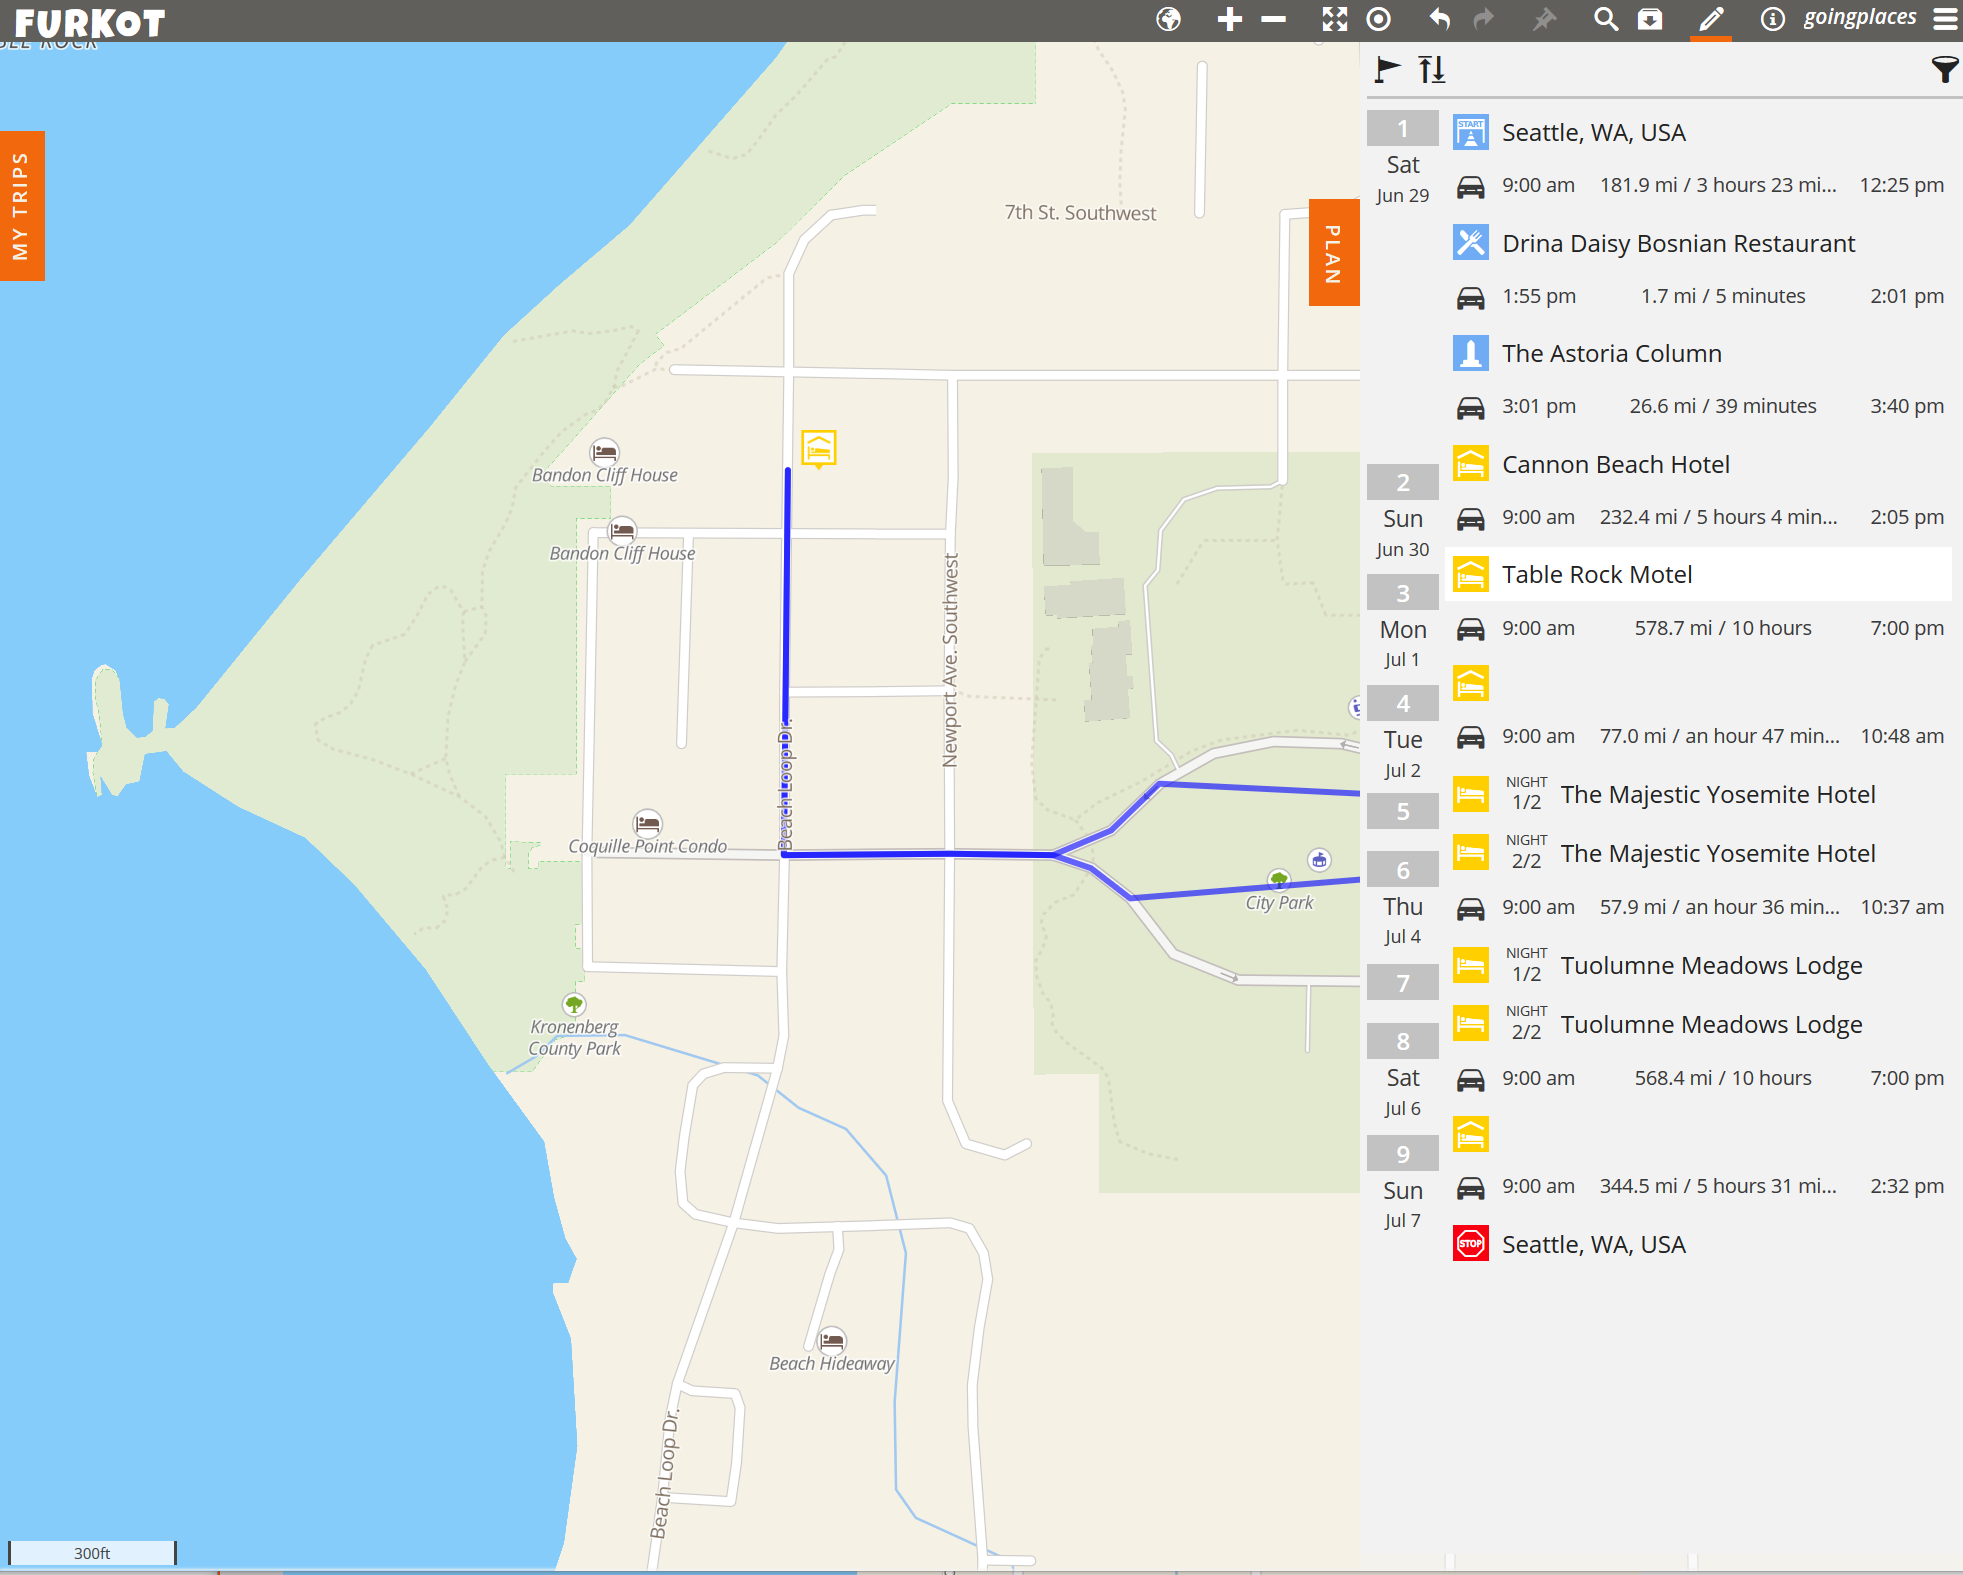
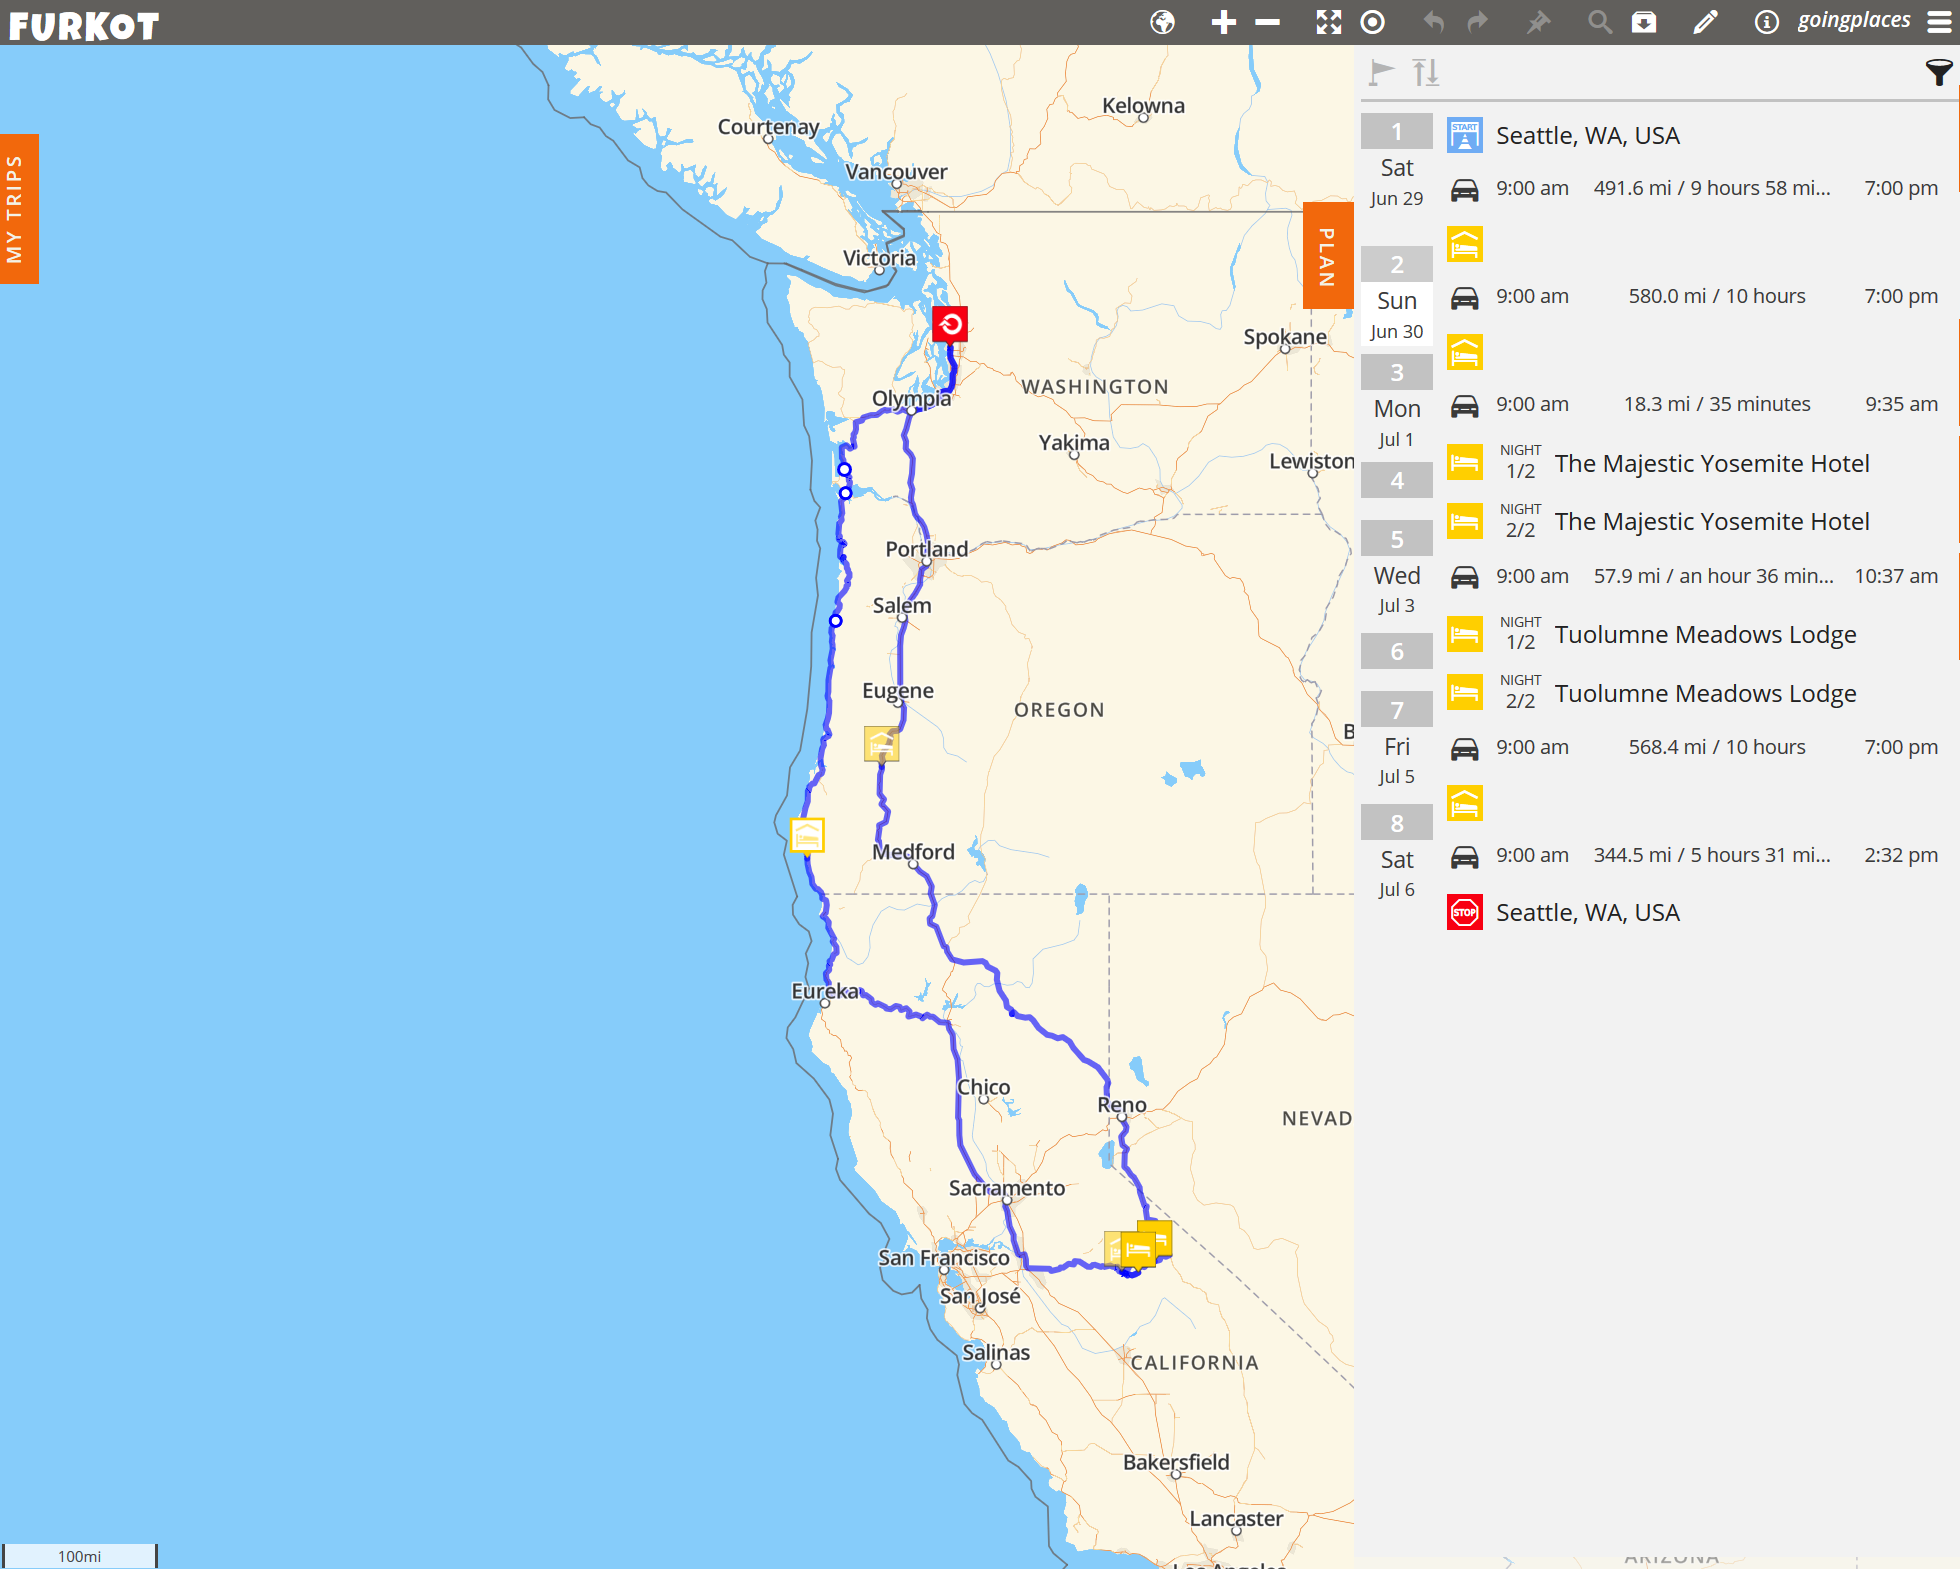
If we take a look at the Plan drawer now, we are still on track to arrive two days early to Yosemite, with one more overnight stop.
So let’s make our stops in Cannon Beach and Bandon into two-night stops, and then we’ll figure out where to spend the night of July 3rd.
In the plan drawer, click on Cannon Beach Hotel (or whichever hotel you selected in Cannon Beach) and change it to two nights. Then click Save. And click the X to close it. Repeat with your Bandon hotel.
Now let’s add just one more stop on the way to Yosemite. On the map just north of Redding, California, is Lake Shasta. Zoom in on the area of the lake, open your Find drawer, and show parks and natural features using the icon at the top of the drawer. You should see Lake Shasta Caverns. Click on it and then click on the link to visit their website. Exploring there, you’ll see there is a 2‑hour tour. Let’s add that to our plan.
Go back to Furkot and click to add a Stop at Lake Shasta Caverns. Since we know the tour is 2 hours, let’s pad that and make it a three-hour stop. Then click Save and the X.
Back on the map, notice that Furkot has modified our route. It has us arriving at Lake Shasta Caverns at 3:20, which is cutting it close (according to their website, the last tour is at 4:00). So let’s spend the night in Redding and then we can hit the caverns first thing in the morning.
Zoom the map in on Redding use one of the methods described above to select lodging. I’m going to pick the Best Western Plus Hilltop Inn. Furkot has us correctly arriving on July 3rd and departing on July 4th, so all’s good. Click the X.
Now the last thing we need to fix is to move our visit to Lake Shasta Caverns down to the next day. Simply hover over it and click the down arrow.
When I did that, Furkot did something I didn’t like: it created a long route to get from Redding to the caverns. I fixed it by dragging the route so we will double back.
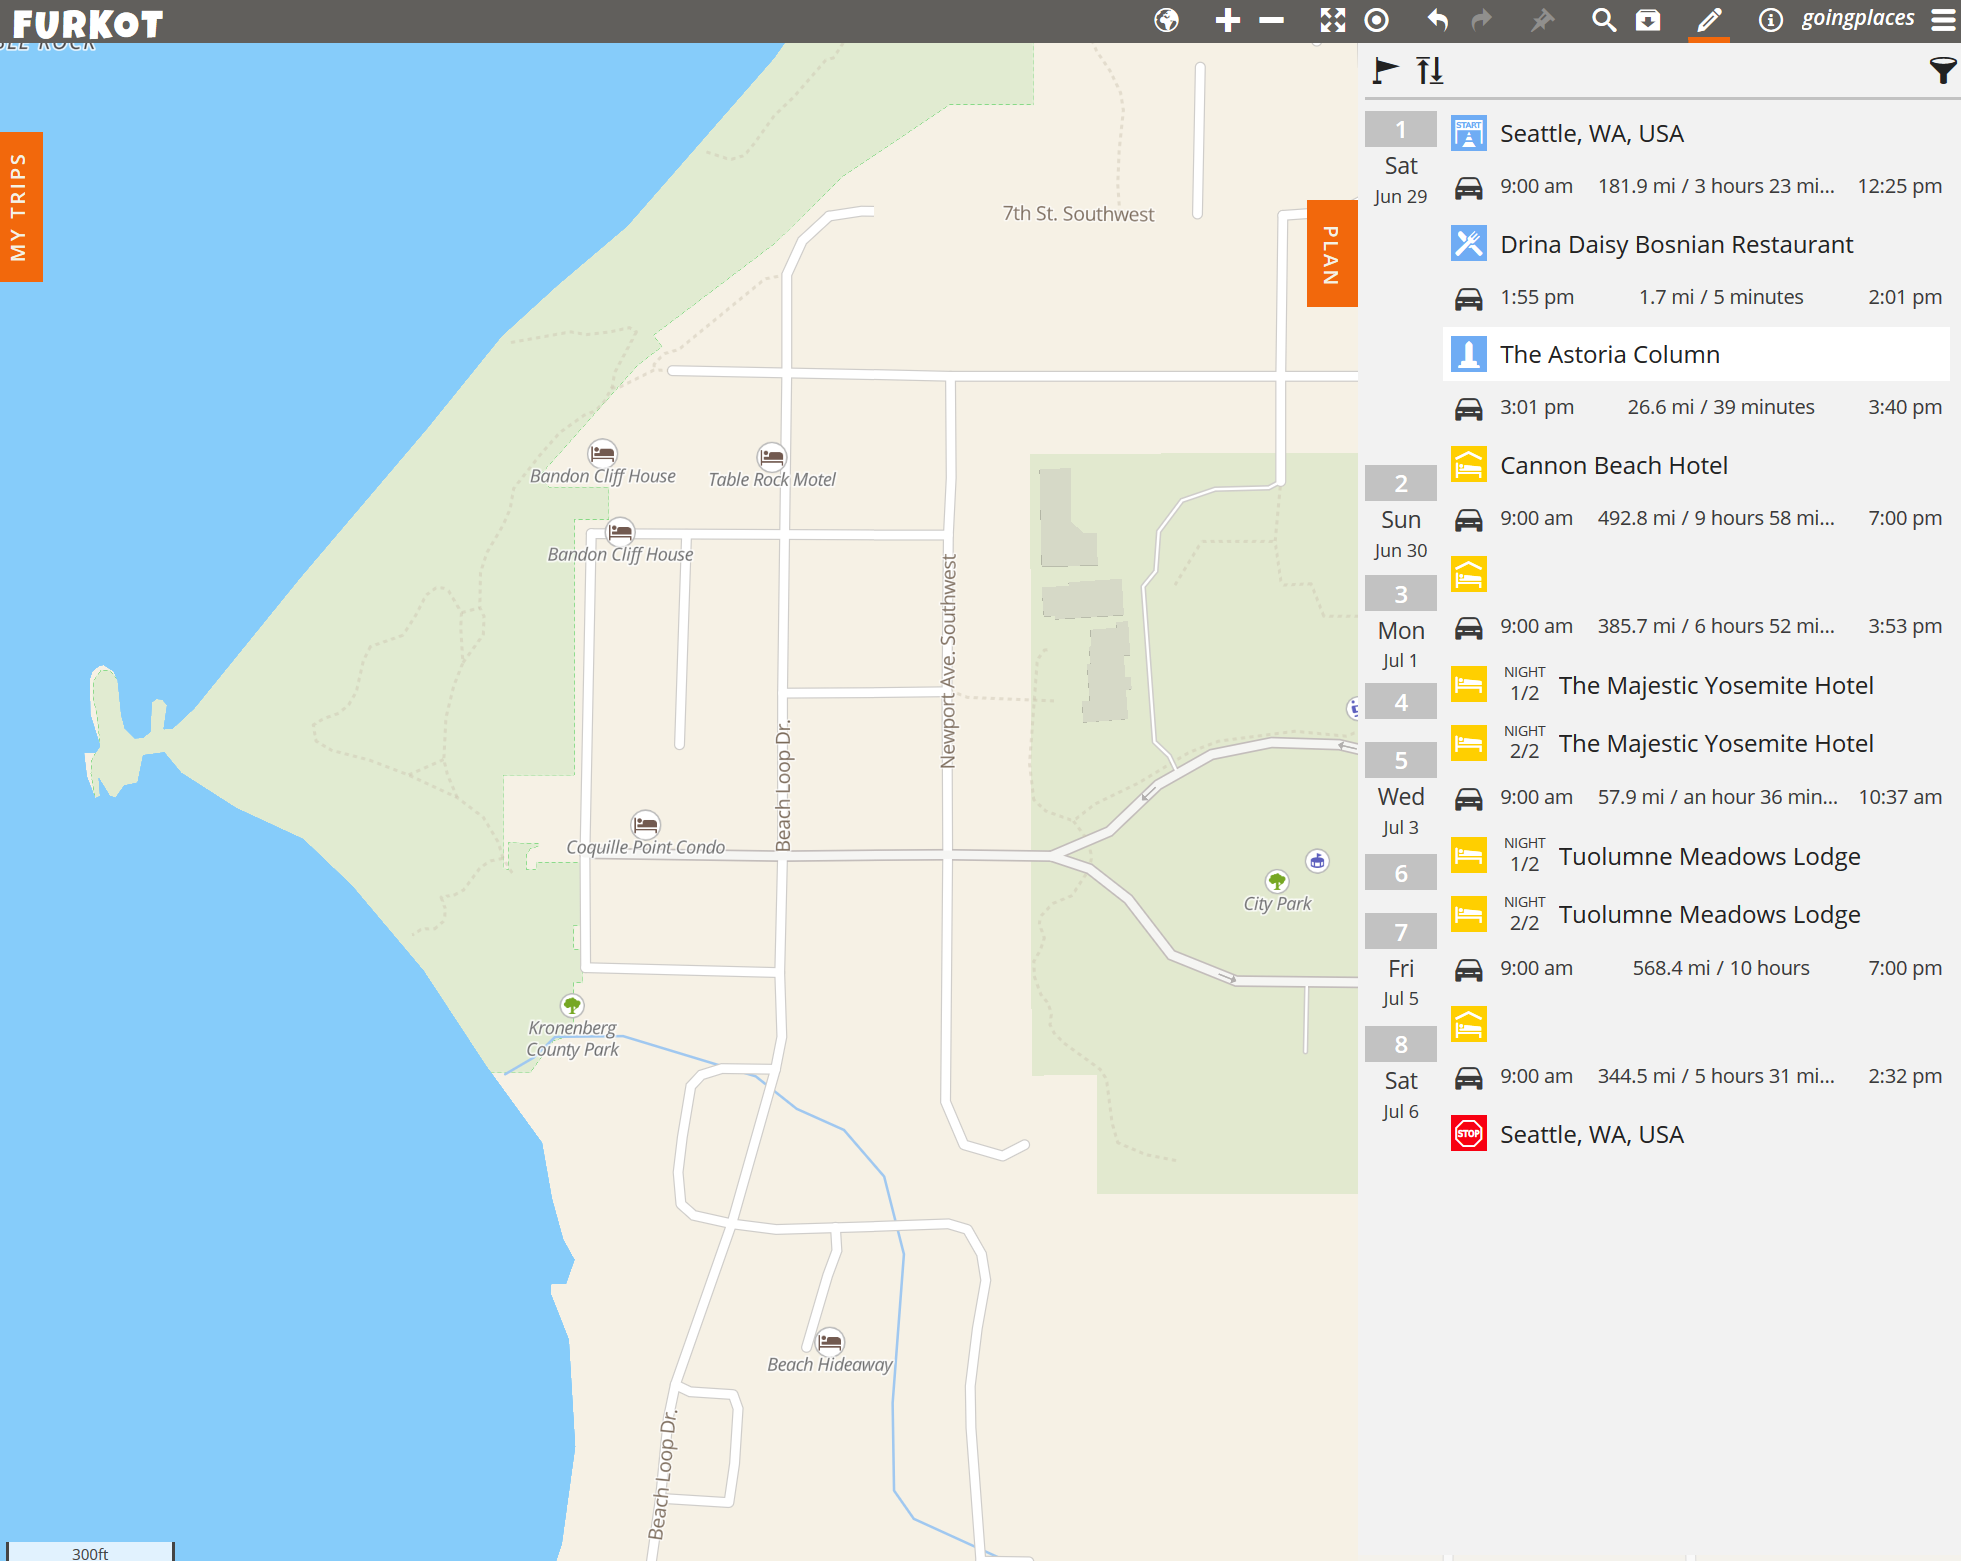
Here’s what my trip looks like now:

Step Six: Fine tune everything
We still need to figure out our plan for the drive home. Maybe we could extend our time in Yosemite or visit one of the other national parks in northern California. Maybe a stop at Crater Lake or Mount Hood, or a detour through the Columbia River Gorge. Furkot can help figure out how long it will take, plan your driving routes, and schedule your stops.
There are a few other things we need to adjust. We didn’t allow any time for rest stops, fuel stops, or (except in Astoria) meal stops. Those things will add time to our travel each day. But rather than trying to account for all of that, I think it makes more sense to build in some cushion into each travel day. We set our travel day from 9:00 am to 7:00 pm, and Furkot calculated how far we can travel each day based on that. If you really want to ensure you aren’t driving after a certain time, or more than a certain number of hours each day, adjust your travel day accordingly. Set your stop time at 5:00 pm, for instance, if you want to quit driving by 7:00 pm. That will give you a two hour cushion to allow for those spontaneous stops.
If you’d like to see a more real-life version of my Yellowstone trip or the one I created in this tutorial, send me a message and I’ll share them with you. The Yellowstone trip I will share read-only. The Yosemite trip I’ll share and allow you to edit it and play around.
I’ve only touched on a small subset of all the available features in Furkot. Each time I use it, I discover something new. It’s a powerful tool with a vast set of features.
Furkot is not a perfect tool by any means. It seems downright buggy when performing certain tasks, the user interface is quirky, and it sometimes behaves oddly. But if you plan your roadtrip with Furkot, and you can get past these issues, you can get some excellent ideas and create a great plan for your next road trip. Plus, you might find you are enjoying the planning as much as you enjoy the trip!
Leave a Reply